Search This Blog

Thursday, 22 February 2018

Glow in the Dark Shadow Box.

Now this one is the bigger than all... again the use of same 12 X 12 Parchment paper and one more amazing project... so happy and excited to make this... and the outcome is superb.


Now for this fabulous project u will need:
1. Dark Green Cardstock
2. Pattern Parchment Paper
3. MDF frame cutout, MDF Swirls cutouts
4. LED
5. Few Die Cuts, Decorative laces and mulberry flowers

Steps to make:

1. Make a shadow box from the Dark Green Cardstock and fix LED in it.

2. I embossed the MDF swirl cut outs with chunky white embossing powder first to get the desire texture and than again done Gold embossing on it to get such effects... u can also get such effects with the texture paste.. I tried something different as this time i did not want to use any wet mediums


3. paste these swirls in mirror position on the cardstock and  fussy cut from the outer side

4.place the pattern parchment paper in the center and stick it...


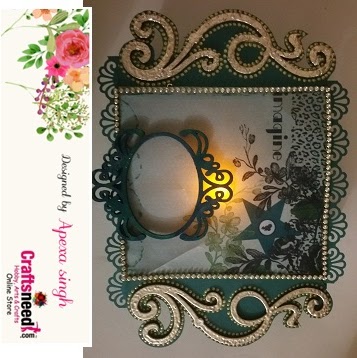
5. I also used a small MDF frame to fix up the pic in this....


6. Stick mulberry flowers and some die cuts to decorate it

here are some more clicks....


Sunday, 31 December 2017

shabby chick tissue box

Created this shabby chick tissue box with handmade flowers and stamping on decoupage techniques


more than word MIX Media Challenge

Being a Family means you are part of something very wonderful... it means you will love and beloved for the rest of your life no matter what.....

This is Apexa Nagar from India and  would like to thank more than word challenge group for such a wonderful subject..,.,
here I prepared this art journal cover with this beautiful topic...


I used scraps i collected from my floral dies as background.. than i pasted die cut numbers in different papers i created with my darling son... i gave him a paper to play along with the colours.. he splashes colours on that paper and enjoyed playing with colours and this way i got this beautiful coloured paper

i cut few numbers with the help of dies and also used these numbers to paste it on the bcakground
pasted corrugated papers side by and also used waste chipboard cutouts i was having in scrap..
applied a nice coat of black gesso
also embossed few number die cuts for putting some more on background

used two circular die cuts one big and one small to Create no 8 and also embossed those circles and used my sons pics to put in to that no 8 frame...
also used this print to show the unity in the family as one of the emblishment

here are few close ups and more images of my page cover....


I would like to enter it to the current challenge at More than Words, which is 'Numbers and Family'


W-201712-Main.jpg

Thursday, 14 December 2017

Thank you Itsy Bitsy for this nice gesture,,,

feeling so excited as myself in a spotlight

this is a proud moment for me... thank you Itsy Bitsy for this honour...

can check out my creations with ItsyBitsy Products on the following ling

http://blog.itsybitsy.in/crafter-in-the-spotlight-5/

Time to welcome Santa with a beautiful mixed media frame


Dashing through the snow
In a one-horse open sleigh
O'er the fields we go
Laughing all the way
Bells on bobtail ring'
Making spirits bright
What fun it is to ride and sing
A sleighing song tonight!

These words kept ringing around my ears until I made this beautiful Mixed media frame. I completely tried to replicate the above lines in my art work.. Added some snow, horse, green bells, colors as per the soothing mood that sets in during the beautiful arrival of Santa. 

Since our childhood we have always heard Santa giving us gifts, but why not decorate the main door this time with a beautiful piece of Mixed Media and welcome our dear Santa home.


So once again I am back with my new project based on the coming festival.....


To make this beautiful mix media frame i used the listed material shown at the end of all instructions

I am also putting step by step instructions to understand you the project well 

1. To create this project the very first step is to give a layer to the chipboard  with texture paste 


2. next step is backing up the frame with black cardstocks


3.Assemble all chipboards as per your own choice taking care of the balancing all objects and colour it with the acrylic paints


4. Collect all decorative u have readily available with you to decorate your frame
here i have made few paper flowers and leaves, also created tassel from wool and some golden and white different sizes pearls
5. Gave some extra decoration  to the chipboard christmas tree,, with some stars hanged on the strings, decorative stones and gave effect of snow with small white pearls on top of the tree


6.Decorate the frame with the flowers and leaves golden pearl hangings


Wishing u all a very Happy December and the beginning of a beautiful festival. If you liked my project do leave some love in the comment section below

Sending Christmas hugs,
Apexa Singh

Tuesday, 28 November 2017

hi friends, here again Apexa Singh on craftsneed platform with a new project which will help you to create some art of representing your goodies...


1.to create this goodie bag i have used a wonderful die cut pattern paper from craftsneed.com
the paper itself is very stiff so u can make the bag directly from the paper. but i have used a black cardstock to give a thin border to the pattern paper for nice appearance..
2.score the pattern paper from the center as shown in the picture and fold it 
3/.paste the black cardstock in three parts

4. put a decorative washi tape on the joints to cover it and for the finished look


5.Cut two stripes measures pf 12 inches x 2 inches and score 0.5inches from both the sides and fold it
6. stick those strips in a triangular foam as shown, paste the base also and the 2nd half layer

7.after sticking the stripes ur goodie bag will look like this

8,have cut a border and paste it to the base of the bag and cover this border joints again i have used the washi tape
9..  collect ur decoratives like mulberry flowers, diecuts, pollens to decorate the bag
10.I also created a rosette to combine these decoratives and to give some more dimensions to my project...

11.assemble these decoratives on the rosette and paste it on one of the corner of this bag..
12. I also created a small wish tag and put on the bag...

hope the tutorial will be useful to you all and  also inspired to make something on this coming festivals

putting few more glimpses of y project to understand some more details. If u love this project leave ur love with some comments below.... thank you


Live your dream

 Everyone has courage and power to live their dreams...  the only thing that you need to take it as an adventure.... Living your dreams is n...