Search This Blog

Monday, 6 May 2019

Distressed 3D frame

Hello friends ....

As u all know we have a collaboration this month I.e. Art Studio by Apexa and Hands to heart by Shrishti Arora.... and we will be creating some really cool and fun projects together on our YouTube channels.

Have created very first project by keeping this colour theme challenge by Art daily cafe this month..... the colour scheme is really cool and one of my favourite too🥰🥰🥰

So let me just share a pictorial for my project though I have a video Tutorial on this ( https://youtu.be/rbz-ptqSpgs ) but this one is for my those friends who all really love to read blogs....

Steps to follow:

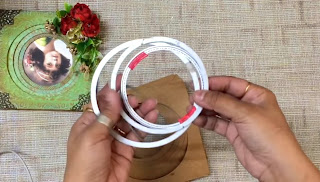
Step 1 : Cut 4 squares of size 6" x 6" from Kraft sheets with circular nested dies as shown in the picture 


Step 2 : Emboss all four squares with different embossing folders
STEP 3 : Stick all 4 squares with foam tapes to create dimensions to give 3D look to the frame keeping the smallest circle at the lowest place.
Step 4: paint the complete frame with two shades i.e. Teal and brown and blend them properly....I have used
 1. Teal blue
2. Brown shade


Step 5 :  Take sand paper and rub it  the frame to give distressed look
Step 6 : once u get ur required distressed effects can take a distress oxide ink -  Shade "Vintage Photo" and distressed edges of the frame further 
You will get some really cool effects by doing this


Step 7. Can decorate the frame with some artificial flowers and leaves.... I have used red flowers and some golden fillers to match with my photos 
Step 8 : Was feeling that the frame is incomplete without some corners so stocked these filigree with Glossy Accent
And finally I could get this really vintage look to my frame.... friends hope u have enjoyed the process....


If u wanna take part in Art daily cafe than above is the link ....will come up with some more cool projects this month..... stay tuned.... happy Crafting 🥰🥰🥰🥰




FOCUSED!!!!

Greetings friend!!!

It's not about perfection!!! Its all about efforts and when u bring that efforts every single day, that's where transformation happens and that's how change occurs!!!!


"DONT FOCUS ON WHAT I AM UP against. I FOCUS ON MY GOAL AND I TRY TO IGNORE REST".......Venus Williams

Hey friends!!!here I am so excited to present my very first project with The Academy of Scrapbooking and Arts!!! And I named my project as "Focused"

The theme of the month is Flowers and I associated the flowers with FOCUS as I accept both - " complements and Criticism"
It takes both Sun and rain to grow a flower!!!!

And so I wake up with determination and go to bed with satisfaction 😍😍😍😍


In My project I followed the following steps with all my thoughts!!

- For the Background I used all my scrap pieces and embossed them with multiple embossing folders
- I coloured them with multiple shades of distress oxides and edged them with some vintage shades
- I stuck them all together in the centre part of my panel by little overlapping and the part which I could not cover simply apply contrasting shades just with my fingers

- stencilling on the rest of the part
- stuck some art stones mixed with heavy body gel
-for enhancements and to match with some of my leafy die cuts and dailies, I created little free hand designs with 3d outlines
-Also prepared some MDF embellishment covered with textured paste and coloured again by distress inks applied with daubed

-Finalised my composition deciding the focal point with The Tital "FOCUSED" and also decided the corners to balance the focal point.

-And stick all elements together!!!!
Tadaaaaa..... I simply love my project with this amazing composition and my message with it!!!!
How about u friends???
If the project has really inspired  you in any ways... would really love to see ur love in comments!!!!

Happy Crafting!!!

Thursday, 11 April 2019

Greetings friend!!!

Hey friends!!!here I am so excited to present my very first project with The Academy of Scrapbooking and Arts!!! And I named my project as "Focused"

The theme of the month is Flowers and I associated the flowers with FOCUS as I accept both - " complements and Criticism"
It takes both Sun and rain to grow a flower!!!!

It's not about perfection!!! Its all about efforts and when u bring that efforts every single day, that's where transformation happens and that's how change occurs!!!!

Can see  more Details of the project on Academy of Scrapbooking and Arts blog!!!

So what are u waiting for?  Come and enjoy the process of making this wonderful project on by clicking the link below!!!

Academy of Scrapbooking and Arts 


"DONT FOCUS ON WHAT I AM UP against. I FOCUS ON MY GOAL AND I TRY TO IGNORE REST".......Venus Williams
And so I wake up with determination and go to bed with satisfaction 😍😍😍😍

See u  on the Academy of Scrapbooking and
Arts
Till than happy Crafting!!!! B'bye💖💖💖

Friday, 15 February 2019

The only key to success is hard work


The only Key to Success is hard work and Dedication... 


this is what i actually believe..

This project I created to put it on my own Art journal and it's very close to my heart as I have made it for Scrapbooking world championships organised by Academy of Scrapbooking and Arts. I really feel so lucky to be a part of this championship.

Steps I followed
1.This is created by putting multilayers of different metal emblishments as well as wooden emblishments.

2. But before arranging these emblishments I prepared my base by covering with clear gesso and lots of stamping and gold embossing.

3.I gave a layer of stencilling by applying modelling paste and used the coordinating stencils with my stamp sets

4.I also embossed few cardstocks and used them as one of the layers

5. I also used textured cardstock to create metallic impressions on my project. And also gave tiny details by putting extra dots to give some rivets and welding metal effects


6. I cut small punched circles and cut them from the Centers to create some screw effects.

7.I sticked 4 die cuts together to create some emblishments from dies.

8. Few parts I have painted desperately and stocked on the base.

9. The quote I have taken a print as per the size of my wooden emblishment window and stock.


10. The final touch I gave by applying different shades of acrylic paints. Specially I used Orange and Sap Green shades to give earthen look to my project


11. Further highlights I have given with white Jesso.

12.Lastly I gave a dry brushing with metallic gold paint to give a very ethnic look as my taste is very much vintage and antique


So in my mix media I covered all following techniques

1.Preparing base with multistamping
2.Putting layers of stencils
3.Created emblishments with die cuts
4.Created texture by mixing sand to the texture paste, embossed cardstocks and by using textured cardstock
5.Gave metal plate touch by adding few dots and screw effects on textured cardstock.
6. In painting I used mostly dry brush techniques and gold embossing

Material I used :
Prima - Art Basics - Gesso - Clear

Super Fine Gold - Embossing Powder


Golden Powder 


Hope you all like the project where lots of techniques I have tried to cover
Love and Regards

Apexa😍😍😍

A special thanks to Academy of Scrapbooking and Arts for giving me such a wonderful opportunity and platform to showcase my art work


Fabulous Darling- An Altered chocolate box

Hey friends!!! Wishing u a very happy Valentine's day.....

Today on this special day I dedicate this post to a lovely Splasymix challenge blog as a Guest Designer

For me everyday is a Valentine'sday as I love gifting my loved ones everytime I feel gifting....

And here is a chocolate box I altered to gift on this special day....


"Being deeply loved by someone gives you strength, while loving someone deeply gives you courage.."👏👏👏well said.... but love is not only something you feel....it is something you do... so celebrate this Valentine day by gifting your loved ones in such unique pack of chocolates.....here is a heart shaped chocolate box I altered as a "Fabulous Darling.... "

To create this box I assemble all the elements like jute cloth, corrugated sheet, a broken spoon handle? Few emblishments took out from the moulds, mask, ribbons, beads etc.


I painted everything with black gesso
Started painting with crimson and terquiesh blues as shown with a little dry brush technique.


Further highlighted with white gesso and golden paints.


Here are few more glimpses of heart shaped chocolate box I altered.... hope you all like it!!!


feel the love, do something for your loved ones!!!! Happy Crafting!!!!

Love you all!!!!

Apexa

Monday, 28 January 2019

Every eyes says Something

Hello friends.....
A very good morning from Apexa.....

Every eyes says something.... that's what I know....
It's just like There's  always

Some truth behind
"Just Kidding"

Knowledge behind
"I don't Know "

Emotions behind
"I don't Care" and......

Pain behind
"It's okay....."

Here is my  mini take dedicated to those eyes who says many things but ppl don't understand.


I used all my waste different size circles came out from my die cuts. For the background 


Partly I covered my cardstock with texture paste and crackle pastes to give more textures on the background 


Hope you like my take on this mini card I created for More than words challenge 
Also made it considering moodboard from Lindy's stamp gang


Thank you for stopping on my blog!!!!


Live your dream

 Everyone has courage and power to live their dreams...  the only thing that you need to take it as an adventure.... Living your dreams is n...