Search This Blog

Sunday 31 December 2017

shabby chick tissue box

Created this shabby chick tissue box with handmade flowers and stamping on decoupage techniques


more than word MIX Media Challenge

Being a Family means you are part of something very wonderful... it means you will love and beloved for the rest of your life no matter what.....

This is Apexa Nagar from India and  would like to thank more than word challenge group for such a wonderful subject..,.,
here I prepared this art journal cover with this beautiful topic...


I used scraps i collected from my floral dies as background.. than i pasted die cut numbers in different papers i created with my darling son... i gave him a paper to play along with the colours.. he splashes colours on that paper and enjoyed playing with colours and this way i got this beautiful coloured paper

i cut few numbers with the help of dies and also used these numbers to paste it on the bcakground
pasted corrugated papers side by and also used waste chipboard cutouts i was having in scrap..
applied a nice coat of black gesso
also embossed few number die cuts for putting some more on background

used two circular die cuts one big and one small to Create no 8 and also embossed those circles and used my sons pics to put in to that no 8 frame...
also used this print to show the unity in the family as one of the emblishment

here are few close ups and more images of my page cover....


I would like to enter it to the current challenge at More than Words, which is 'Numbers and Family'


W-201712-Main.jpg

Thursday 14 December 2017

Thank you Itsy Bitsy for this nice gesture,,,

feeling so excited as myself in a spotlight

this is a proud moment for me... thank you Itsy Bitsy for this honour...

can check out my creations with ItsyBitsy Products on the following ling

http://blog.itsybitsy.in/crafter-in-the-spotlight-5/

Time to welcome Santa with a beautiful mixed media frame


Dashing through the snow
In a one-horse open sleigh
O'er the fields we go
Laughing all the way
Bells on bobtail ring'
Making spirits bright
What fun it is to ride and sing
A sleighing song tonight!

These words kept ringing around my ears until I made this beautiful Mixed media frame. I completely tried to replicate the above lines in my art work.. Added some snow, horse, green bells, colors as per the soothing mood that sets in during the beautiful arrival of Santa. 

Since our childhood we have always heard Santa giving us gifts, but why not decorate the main door this time with a beautiful piece of Mixed Media and welcome our dear Santa home.


So once again I am back with my new project based on the coming festival.....


To make this beautiful mix media frame i used the listed material shown at the end of all instructions

I am also putting step by step instructions to understand you the project well 

1. To create this project the very first step is to give a layer to the chipboard  with texture paste 


2. next step is backing up the frame with black cardstocks


3.Assemble all chipboards as per your own choice taking care of the balancing all objects and colour it with the acrylic paints


4. Collect all decorative u have readily available with you to decorate your frame
here i have made few paper flowers and leaves, also created tassel from wool and some golden and white different sizes pearls
5. Gave some extra decoration  to the chipboard christmas tree,, with some stars hanged on the strings, decorative stones and gave effect of snow with small white pearls on top of the tree


6.Decorate the frame with the flowers and leaves golden pearl hangings


Wishing u all a very Happy December and the beginning of a beautiful festival. If you liked my project do leave some love in the comment section below

Sending Christmas hugs,
Apexa Singh

Tuesday 28 November 2017

hi friends, here again Apexa Singh on craftsneed platform with a new project which will help you to create some art of representing your goodies...


1.to create this goodie bag i have used a wonderful die cut pattern paper from craftsneed.com
the paper itself is very stiff so u can make the bag directly from the paper. but i have used a black cardstock to give a thin border to the pattern paper for nice appearance..
2.score the pattern paper from the center as shown in the picture and fold it 
3/.paste the black cardstock in three parts

4. put a decorative washi tape on the joints to cover it and for the finished look


5.Cut two stripes measures pf 12 inches x 2 inches and score 0.5inches from both the sides and fold it
6. stick those strips in a triangular foam as shown, paste the base also and the 2nd half layer

7.after sticking the stripes ur goodie bag will look like this

8,have cut a border and paste it to the base of the bag and cover this border joints again i have used the washi tape
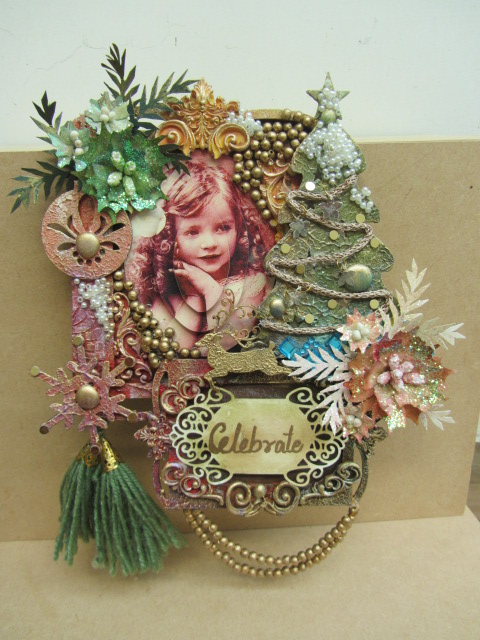
9..  collect ur decoratives like mulberry flowers, diecuts, pollens to decorate the bag
10.I also created a rosette to combine these decoratives and to give some more dimensions to my project...

11.assemble these decoratives on the rosette and paste it on one of the corner of this bag..
12. I also created a small wish tag and put on the bag...

hope the tutorial will be useful to you all and  also inspired to make something on this coming festivals

putting few more glimpses of y project to understand some more details. If u love this project leave ur love with some comments below.... thank you


Tuesday 31 October 2017

Layout using left over festive collection paper packs

This year seems to be running.. its already the 10th month getting over in our calendar and the festivals are also over. Suddenly u feel your houses are vacant, no relatives coming over, those late night giggles and those lovely celebrations have just got over.. But guess what? I have something beautiful for all of you to keep your festival light inside your hearts alive.. Yayyy Yayyy
I am sure you all must have invested in festive paper packs and stencils. You must be thinking about storing it for next year.. But here i have a marvelous project for all of you to make good use of the festival collection..

So here I am, after making so many festive cards and projects with this paper pack... have come up with a layout which u can use it in any season...


 1.I have used this paper from paperious Diwali paper pack where I removed the diya part from the paper aside Have cut few flowers from the cut part of the paper and distressed them with fossilized amber and cracked pistachio distress inks.

2.Have also made these paper sticks with paper size of 4” x 2” and distressed them with same distress oxide shades.
2
2


3.Arranged those sticks to create a frame. Created some extra dimensions with the  modelling paste and diya stencil by arranging up and down and sprinkle glitters on wet paste
3
4. Collect few die cuts and extra decorative material to give  some more details to the layout..

4
5. Arranged these die cuts to the created frame and few more part to the paper

Distress the edges of the paper and from two opposite sides I tear the paper and rolled it up…also colour those folded edges

5
6.Emboss the white Irish paper  with embossing folder and again colour it with fossilized amber and cracked pistachio and place it to the sides of the layouts

6
and here is the final output..... 
hope u like the tutorial and it has given u some inspiration..... if so pl. leave your love by commenting below...coming up with some more tutorials soon

Thank you. 

Saturday 28 October 2017

vintage style star folio

hi lovely crafters,

here i m presenting one more post for u... its a vintage style star folio or can say mini folio... creating this folio was fun... its just 3" x 3" in size....show ur love in comment below if u really like this...


can check this link below for the basic star fold folio

thank you....


Live your dream

 Everyone has courage and power to live their dreams...  the only thing that you need to take it as an adventure.... Living your dreams is n...